PostMaster Mail Accounts
Just as a company doesn’t just have one department which receives traditional mail, your service desk will also serve multiple teams. Each team can have its physical email mailbox.
Rexpondo eases setup for email mailboxes. Rexpondo manages polling one or multiple email mailboxes of any internet standard type.
Use this screen to add mail accounts to the system. The mail account management screen is available in the PostMaster Mail Accounts module of the Communication & Notifications group.
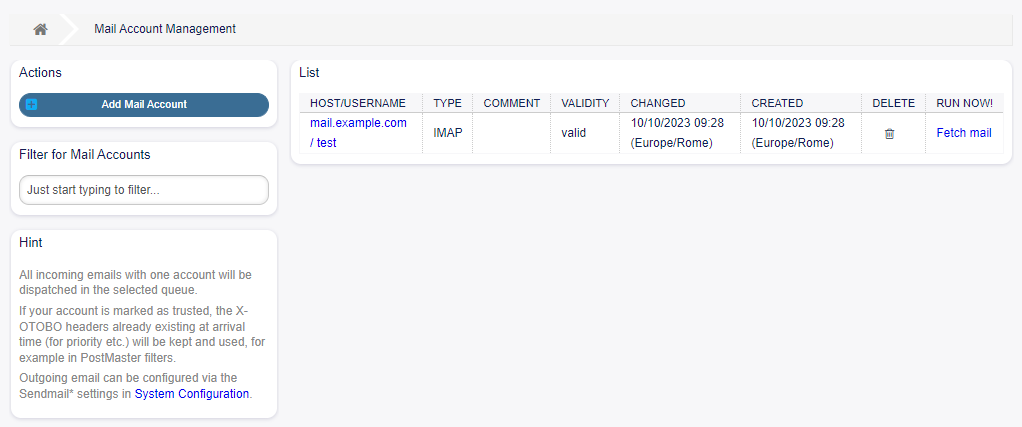
Mail Account Management Screen
Warning
When fetching mail, Rexpondo deletes the mail from the POP or IMAP server. There is no option to also keep a copy on the server. If you want to retain a copy on the server, you should create forwarding rules on your mail server. Please consult your mail server documentation for details.
Note
If you choose IMAP, you can specify a folder for collection. Selective dispatching of mails is then possible.
All data for the mail accounts are saved in the Rexpondo database. The bin/otobo.Console.pl Maint::PostMaster::MailAccountFetch command uses the settings in the database and fetches the mail. You can execute it manually to check if all your mail settings are working properly.
On a default installation, the mail is fetched every 10 minutes when the Rexpondo daemon is running.
Manage Mail Accounts
To add a mail account:
Click on the Add Mail Account button in the left sidebar.
Fill in the required fields.
Click on the Save button.
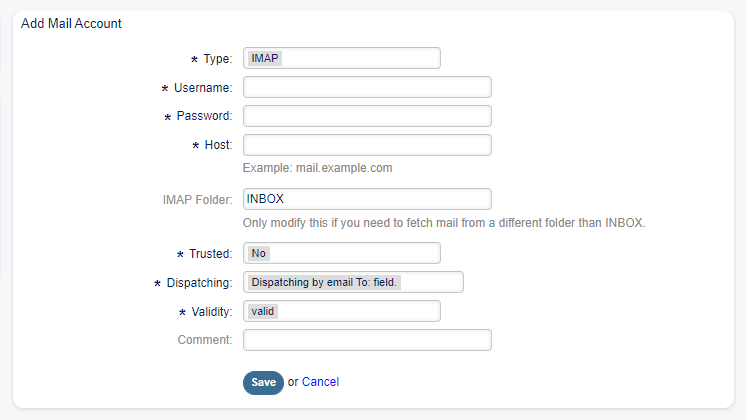
Add Mail Account Screen
To edit a mail account:
Click on a mail account in the list of mail accounts.
Modify the fields.
Click on the Save or Save and finish button.
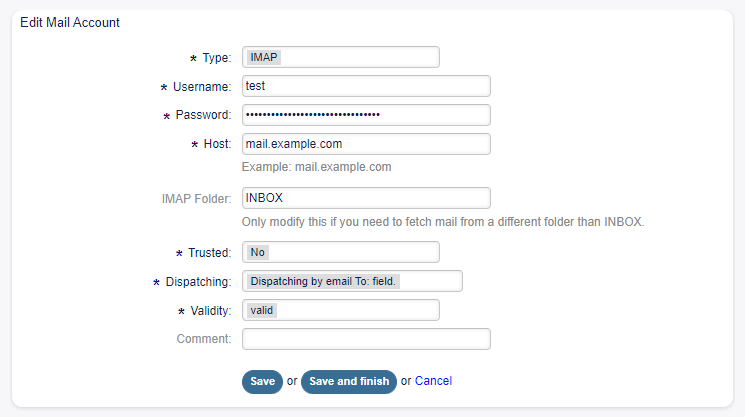
Edit Mail Account Screen
To delete a mail account:
Click on the trash icon in the list of mail accounts.
Click on the Confirm button.

Delete Mail Account Screen
Note
If several mail accounts are added to the system, a filter box is useful to find a particular mail account by just typing to filter.
Mail Account Settings
The following settings are available when adding or editing this resource. The fields marked with an asterisk are mandatory.
- Type *
There are different kind of protocols that are used for fetching mail. The following protocols are supported:
IMAP
IMAPS
IMAPTLS
POP3
POP3S
POP3TLS
- Username *
The username of the mail account.
- Password *
The password of the mail account.
- Host *
The host name of the mail account. Specify how the current article subject should be dealt with. The following methods are available:
- IMAP Folder
The folder in the mail account to be fetched. Other folders remain untouched.
- Trusted *
If Yes is selected, any
X-OTOBOheaders attached to an incoming message are evaluated and executed. Because theX-OTOBOheader can execute some actions in the ticket system, you should set this option to Yes only for known senders.See also
The
X-OTOBOheaders are explained in the filter conditions of Postmaster Filters.- Dispatching *
The distribution of incoming messages can be controlled if they need to be sorted by queue or by the content of the To: field.
- Dispatching by email To: field
The system checks if a queue is linked with the address in the To: field of the incoming mail. You can link an address to a queue in the Email Addresses screen. If the address in the To: field is linked with a queue, the new message will be sorted into the linked queue. If no link is found between the address in the To: field and any queue, then the message flows into the Raw queue in the system, which is the postmaster default queue after a default installation.
See also
The postmaster default queue can be changed in system configuration setting
PostmasterDefaultQueue.- Dispatching by selected Queue
All incoming messages will be sorted into the specified queue. The address where the mail was sent to is disregarded in this case.
- Validity *
Set the validity of this resource. Each resource can be used in Rexpondo only, if this field is set to valid. Setting this field to invalid or invalid-temporarily will disable the use of the resource.
- Comment
Add additional information to this resource. It is recommended to always fill this field as a description of the resource with a full sentence for better clarity, because the comment will be also displayed in the overview table.
POP3 and IMAP OAuth2 Authentication
Authentication via OAuth2 allows you to download emails, creating a ticket from each of them, authenticating via the OAuth 2.0 protocol. This protocol, starting in 2021, will replace so-called Basic authentication (i.e., by simple password), at least for providers like Google and Microsoft.
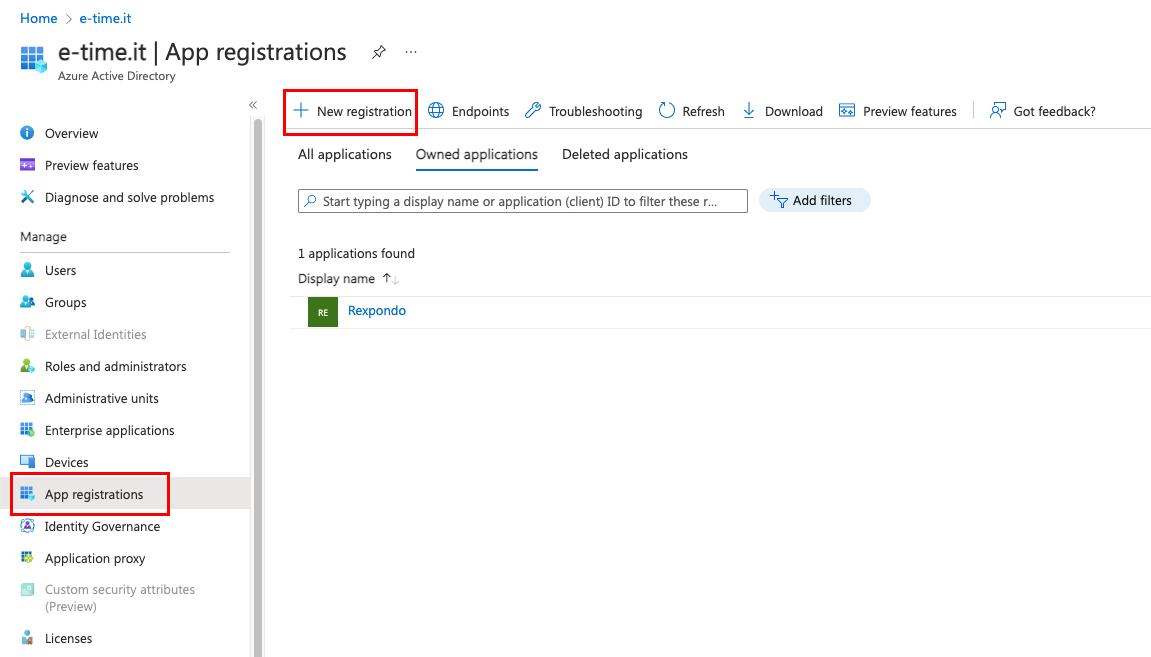
Microsoft Portal Application Registration
To register the Project click the App Registrations icon and click the New Registration icon.
Application Registration Screen
Fill in all the required information and choose from the possible options.
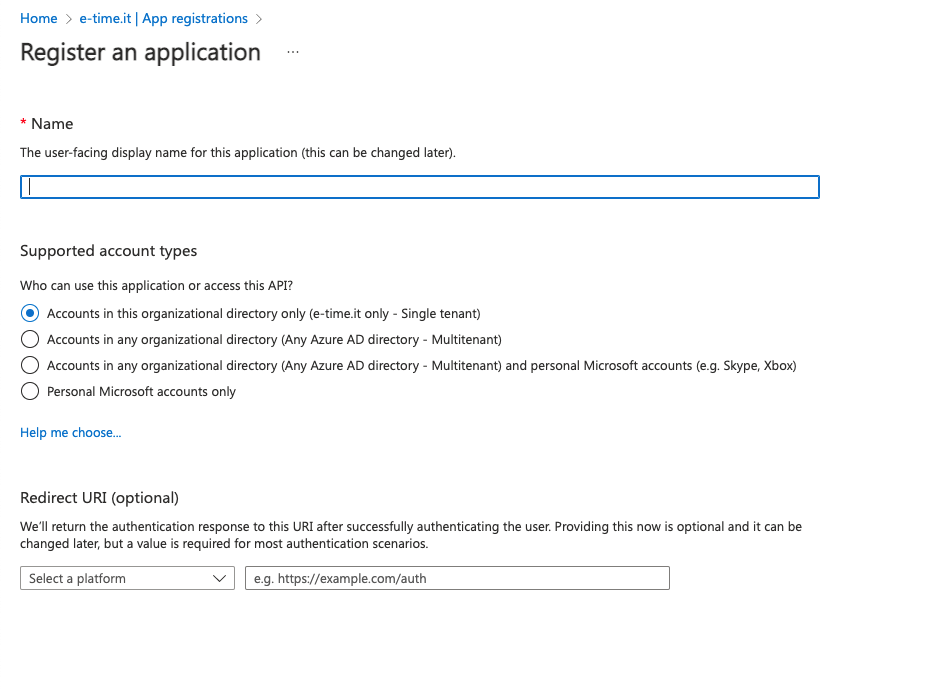
Application Registration Screen
There is also a window in the menu on the left that shows the different requirements based on what you need. Do not fill in the specifications of the “Redirection URL” item (this will be discussed later).
At this point the Application has been successfully created. Some more parameters need to be configured to allow the Application to work with OAuth2.
General Information and Endpoints
This image constitutes the Application control panel on the Azure portal. This screen shows all the options needed to configure your application with OAuth2.
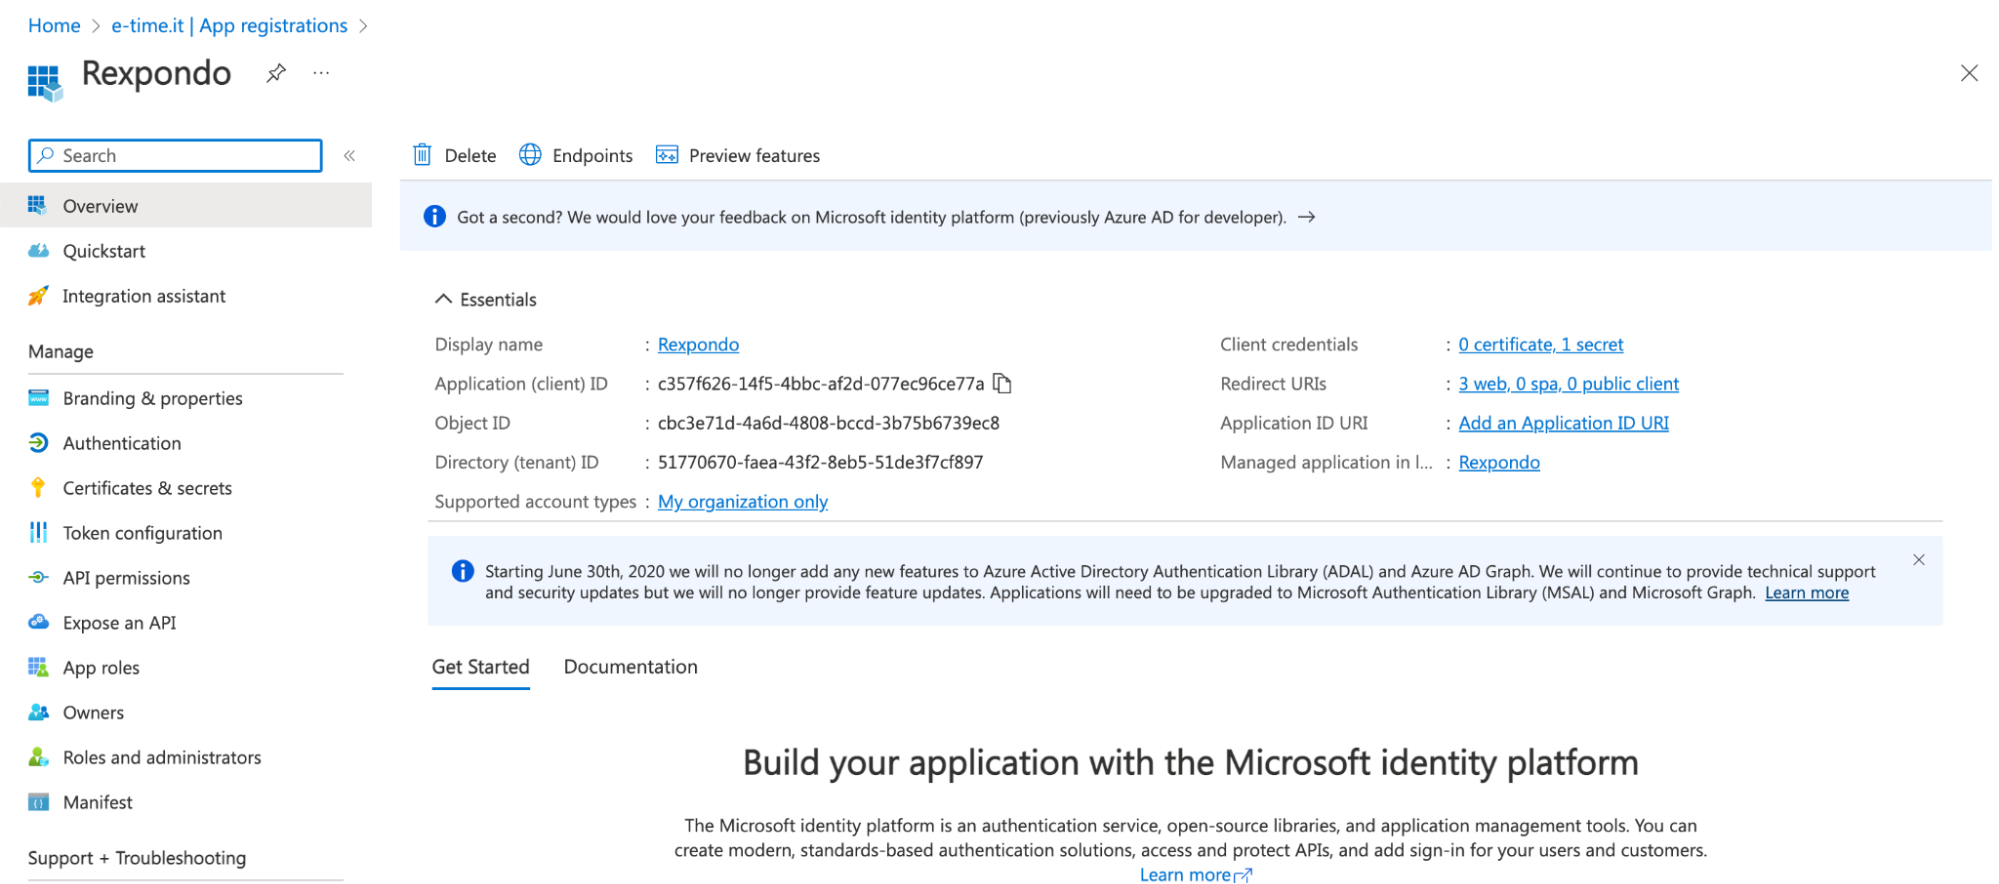
Application Control Panel
- In the Basic Information Panel, there are:
Client ID
Tenant ID
Object ID
Supported Account Types
Redirect URIs
Application ID URI
Redirection URI
The Redirect URI represents the webpage to which you will be redirected once authentication with OAuth2 is completed.
This parameter is very important and allows the granting of permissions to the third-party application (Rexpondo in this case).
Warning
Without this setting, the third-party application will fail to authenticate with OAuth2.
In the next sections you will be shown how to configure this information for interfacing with Rexpondo using OAuth2.
Note
An advice would be that after the authentication with OAuth2, the Redirect URI will take the user back to the Add New Mail Account window in Rexpondo, so it can be saved.
- To add the Redirect URI you will have to
Go to the Application Control Panel
Click on “Add Redirect URI”
Click on “Add a Platform”
Click on the Web box.
Enter the following value:
[PROTOCOL]://[HOST]/rexpondo/index.pl%3FAction%3DOAuth2Core
where the [PROTOCOL] variable corresponds to that of your installation (either http/https) and the [HOST] variable would be the domain of the server on which Rexpondo is installed.
Note
I.E. protocol=http and domain=mycompany.com: http://mycompany.com/rexpondo/index.pl%3FAction%3DOAuth2Core
Certificates and Secrets
The Certificates and Secrets section allows you to add a new Secret to the application. To do so click on the New Client Secret icon, add any description and choose the expiration date and finally click Add.
REXOAuth2 Installation and Configuration
This section allows you to configure all the information shown before to allow mail downloading by authentication with OAuth2.
Microsoft Portal Values Configuration
To configure the Microsoft Portal in Rexpondo, please connect via browser to your Rexpondo installation and, once logged in, go to Admin → System Configurations and type in the key: REXOAuth2::Microsoft
- Fields and their meanings are shown as follows:
AppID: the directory identifier provided by Microsoft when the app was created, reported in the Azure portal as Directory (tenant) ID
ClientID: the identifier of the application, reported in the Azure portal as Application (client) ID
ClientSecret: follow the procedure shown in section 2.3.3 Certificates and Secrets and copy and paste the value of the Secret created.
ClientScope: list the permissions required to read some basic profile information and to read emails. Leave the preset values: https://outlook.office.com/IMAP.AccessAsUser.All Mail.Read openid User.Read profile email openid offline_access
Google Portal Values Configuration
To configure the Google Portal in Rexpondo, connect via browser to your Rexpondo installation and, once logged in, go to Admin → System Configurations and type in the key: REXOAuth2::Google
- Fields and their meanings are shown as follows:
ClientID: enter the client ID generated on the Google console and saved in section 3.2 Credentials
ClientSecret: enter the Client Secret value generated on the Google portal and saved in section 3.2 Credentials
ClientEmailScopes: list the permissions required to read some basic profile information and to read emails. Leave the preset values: https://mail.google.com/ https://www.googleapis.com/auth/userinfo.email
Automatic scheduling configuration
Installing the plugin will configure a rule, called Daemon::SchedulerCronTaskManager::Task###OAuth2MailAccountFetch, which will define how often emails configured as OAuth2MailAccount will be downloaded.
By default emails will be downloaded every 10 minutes.
To change this setting you have to modify the Schedule value of the configuration key above.
OAuth2 Mail Management
Now that the initial parameters have been configured it will be possible to manage a mail account using the OAuth2 protocol. In particular, the following subsections will explain the details of the different possible operations.
Adding OAuth2 Mail Account
To add a new mail account, log-in to your Rexpondo portal, go to Admin → OAuth2 Mail Account and click the Add Mail Account button.
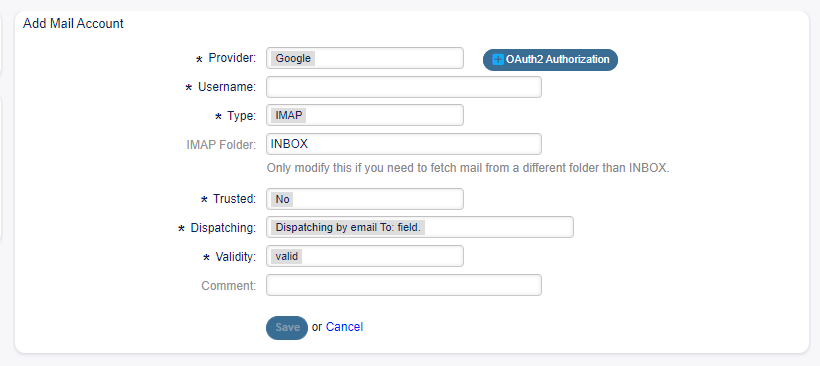
REXOAuth2 Add Screen
The screen contains a number of fields in addition to the Save button, which is initially disabled. In order to enable that button you have to press on the “OAuth2 Authorization” button and complete the steps.
To do so you will have to select your provider and click the the OAuth2 Authorization button. A new window will show up, which will prompt you to log in using your email address and granting the access to Rexpondo to your account via IMAP protocol/POP3 protocol needed for reading the incoming email.
Once you finish these steps and come back to the page on Rexpondo you will find a few fields compiled automatically.
At this point the user can complete the process of adding the mail account, fill in the remaining fields and click the Save button.
The account will then be saved and will be present in the list of OAuth2 mail accounts.
The situation will be as follows:

REXOAuth2 Account List Screen
Deleting Mail Accounts
The image above shows the list of OAuth2 mail accounts. To delete an account simply click on the trash icon and confirm it in the pop-up.
Edit Mail Account
If you want to edit a Mail Account select the account from the list of accounts present.
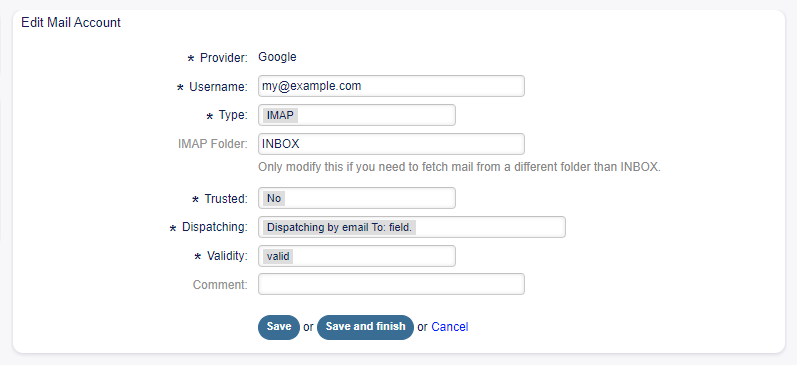
REXOAuth2 Edit Screen
Fetching Mails
Mail downloading can be done in two ways: manual and automatic.
REXOAuth2 is configured by default, as said above, to fetch the new incoming emails every 10 minutes.
In order to fetch emails manually all you have to do is press the button “Fetch mail”.
REXOAuth2 Fetching Mails Manually
Maintenance: Clean tables
Sometimes, like during a package upgrade, the data in the tables will show as not valid anymore. To solve this (but also other potential problems) all you need to do is launch the following command on console which will empty all REXOAuth2 tables in the database.
bin/otobo.Console.pl Maint::RexOAuth2::ClearOAuth2Tables