ITSM Change Management
Change management, according to ITIL, is a service transition process whose purpose is to manage IT changes, including planning, documentation, and implementation upon approval and clearance. The objective is to minimize negative effects on the IT infrastructure, particularly on critical services, resulting from ad-hoc or poorly-managed changes or amendments.
The implementation of Rexpondo::ITSM requires significant technical specification and preparation. Prior to a technical implementation, key elements of the change management process, such as required workflows, metrics or reports, must be defined. The implementation in Rexpondo::ITSM defines a change as an alteration of the existing IT landscape, such as the installation of a new mail server.
As changes typically consist of several sub-tasks, Rexpondo::ITSM allows any number of sub-tasks to be defined per change. These are known as work orders.
Note
This package requires the General Catalog and the ITSM Core features.
Administrator Interface
This chapter describes the new features that are available in the administrator interface after installation of the package.
Ticket Settings
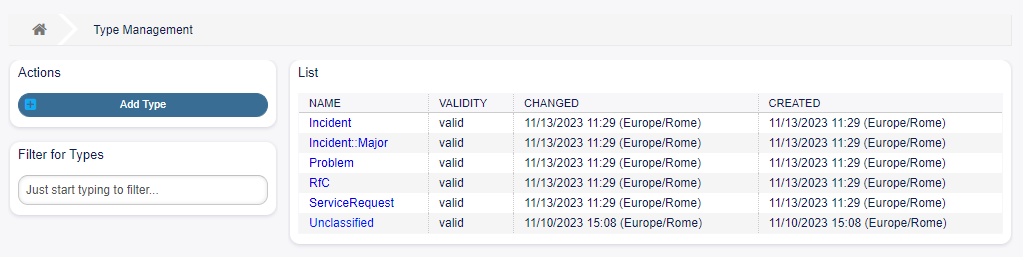
After installation of the package a new type RfC is added to ticket types.
Types
The type management screen is available in the Types module of the Ticket Settings group.
Type Management Screen
New Type
RfC For tickets that are created for change requests.
Users, Groups & Roles
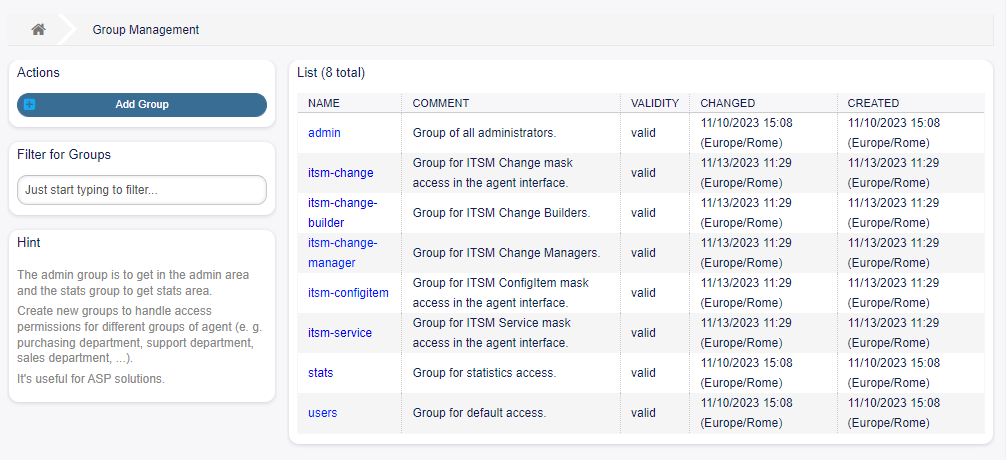
After installation of the package some new groups are added to the system.
Groups
Access to the change management module is managed on a role-based access concept. After installation of the package some new groups are added to the system. The group management screen is available in the Groups module of the Users, Groups & Roles group.
Group Management Screen
New Groups
After installation of the package the following groups are added to the system:
- itsm-change Members of this group have access to the change management module. All potential work
order agents should be assigned to this group. All changes and work orders can be viewed by these users.
- itsm-change-builder Members of this group can create new changes and work orders in the system. All
changes and work orders can be viewed by this group. Changes and work orders created by the change builder, or that have been defined as accessible to the change builder, may be edited by these users.
- itsm-change-manager Members of this group can create new changes and work orders in the system. All
changes and work orders can be viewed by this group. These users can edit all changes and work orders.
Note
The primary administrator user (root@localhost) is added to all groups with permission rw by default.
See also: To set the correct permissions for other users, check the following relations:
Agents Groups
Customers Groups
Customer Users Groups
Roles Groups
Communication & Notifications
After installation of the package a new module will be available to Communication & Notifications group in the administrator interface.
ITSM Change Notifications
Use this screen to add ITSM change notifications to the system. After installing the package several notifications are added to the system. The ITSM change notification management screen is available in the ITSM Change Notifications module of the Communication & Notifications group.
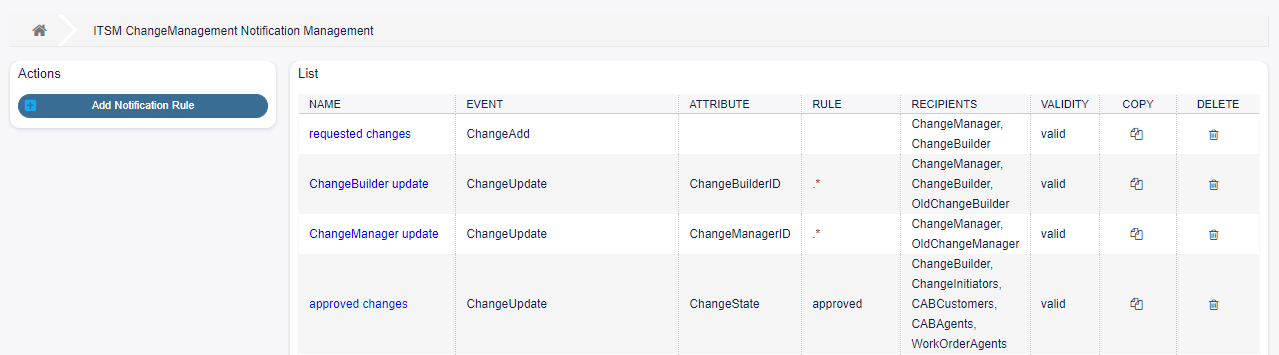
ITSM Change Notification Management Screen
Manage ITSM Change Notifications
- To add an ITSM change notification:
Click on the Add Notification Rule button in the left sidebar.
Fill in the required fields.
Click on the Save button.
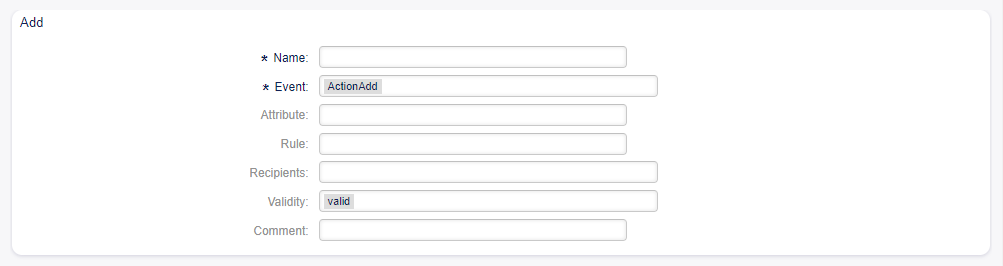
Add ITSM Change Notification Management Screen
- To edit an ITSM change notification:
Click on an ITSM change notification in the list of ITSM change notifications.
Modify the fields.
Click on the Save or Save and finish button.
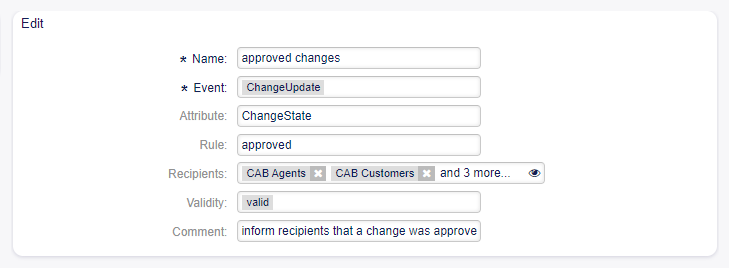
Edit ITSM Change Notification Management Screen
- To delete an ITSM change notification:
Click on the trash icon in the list of ITSM change notifications.
Click on the OK button.
- To copy an ITSM change notification:
Click on the copy icon in the list of ITSM change notifications.

Copy / Delete ITSM Change Notification Management Screen
ITSM Change Notification Settings
The following settings are available when adding or editing this resource. The fields marked with an asterisk are mandatory.
Basic ITSM Change Notification Settings
ITSM Change Notification Settings Screen
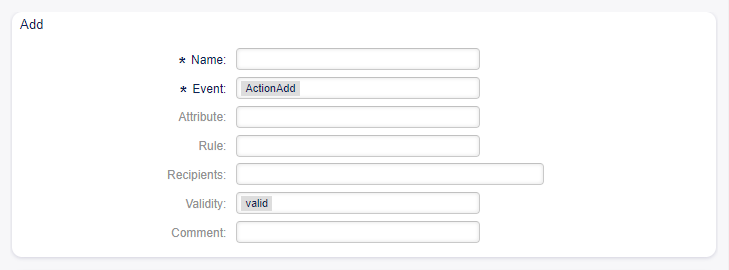
- Name * The name of this resource. Any type of characters can be entered to this field including uppercase
letters and spaces. The name will be displayed in the overview table.
Event * Here you can choose which events will trigger this notification. Attribute The field, that should be listen for the notification. Rule The content of the field, that are set as Attribute. Recipients Here you can select the groups, that can receive the notification. Validity * Set the validity of this resource. Each resource can be used in Rexpondo only, if this field
is set to valid. Setting this field to invalid or invalid-temporarily will disable the use of the resource.
- Comment Add additional information to this resource. It is recommended to always fill this field as
a description of the resource with a full sentence for better clarity, because the comment will be also displayed in the overview table.
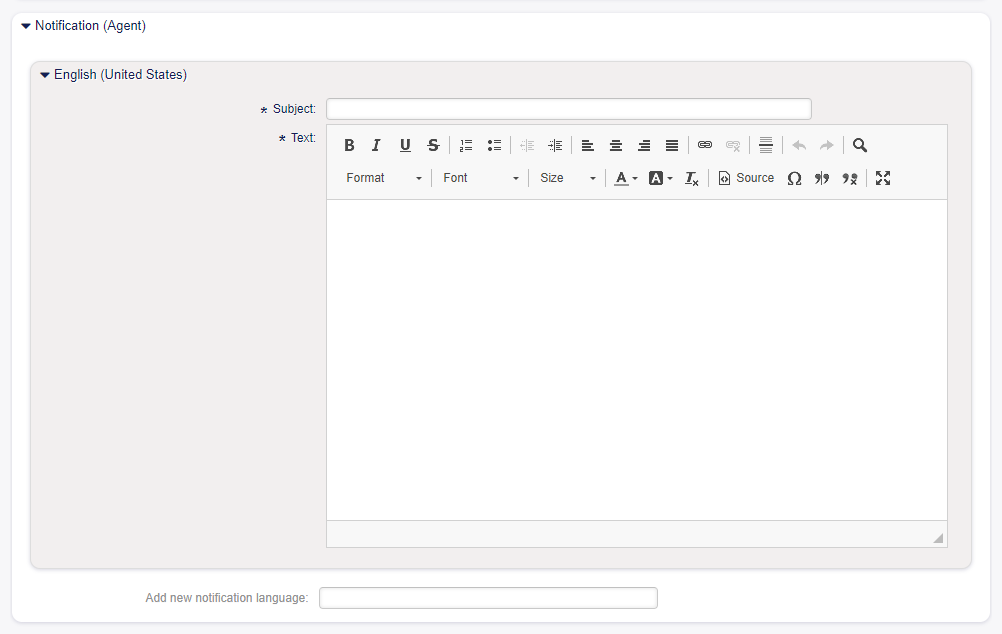
Notification (Agent)
ITSM Change Notification Settings - Notification for Agents Screen
The main content of a notification can be added for each languages with localized subject and body text. It is also possible to define static text content mixed with Rexpondo smart tags.
Subject * The localized subject for a specific language. Text * The localized body text for a specific language. Add new notification language Select which languages should be added to create localized notifications.
Warning
Deleting a language in DefaultUsedLanguages setting that already has a notification text here will make the notification text unusable. If a language is not present or enabled on the system, the corresponding notification text could be deleted if it is not needed anymore.
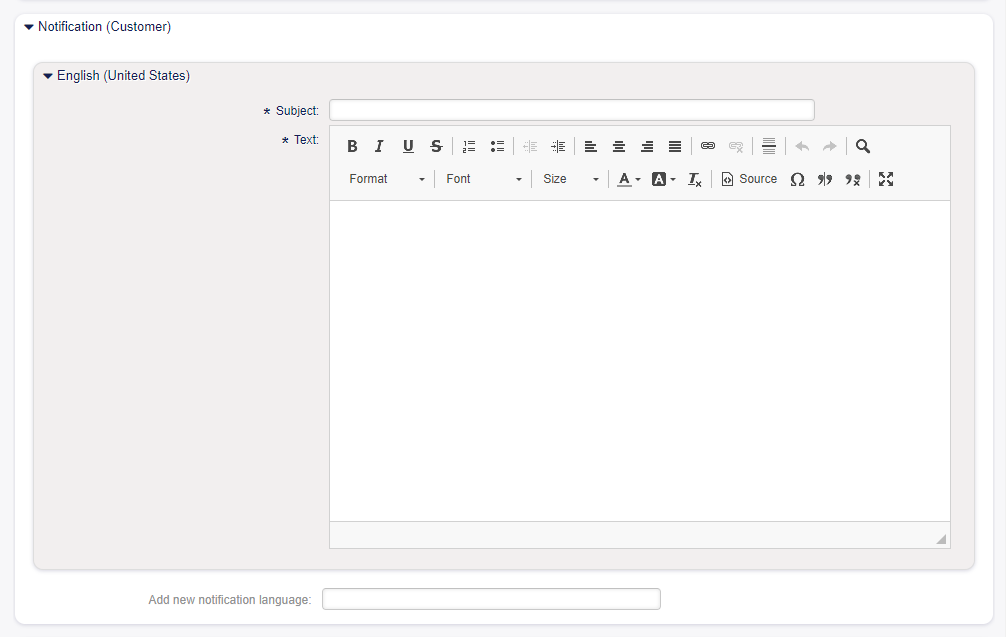
Notification (Customer)
ITSM Change Notification Settings - Notification for Customers Screen
The main content of a notification can be added for each languages with localized subject and body text. It is also possible to define static text content mixed with Rexpondo smart tags.
Subject * The localized subject for a specific language. Text * The localized body text for a specific language. Add new notification language Select which languages should be added to create localized notifications.
Warning
Deleting a language in DefaultUsedLanguages setting that already has a notification text here will make the notification text unusable. If a language is not present or enabled on the system, the corresponding notification text could be deleted if it is not needed anymore.
ITSM Change Notification Variables
Using variables in ticket notifications is possible. Variables, known as Rexpondo tags, are replaced by Rexpondo when generating the mail.
See also: Please check the existing notifications for the list of Rexpondo tags, that can be used in ITSM change notifications.
For example, the variable <OTRS_CHANGE_ChangeManager> expands to the change manager allowing a
template to include something like the following.
This tag expands, for example to:
Administration
After installation of the package some new classes will be available in the General Catalog.
General Catalog
ITSM Change Management adds some new classes to the General Catalog. The general catalog management screen is available in the General Catalog module of the Administration group.
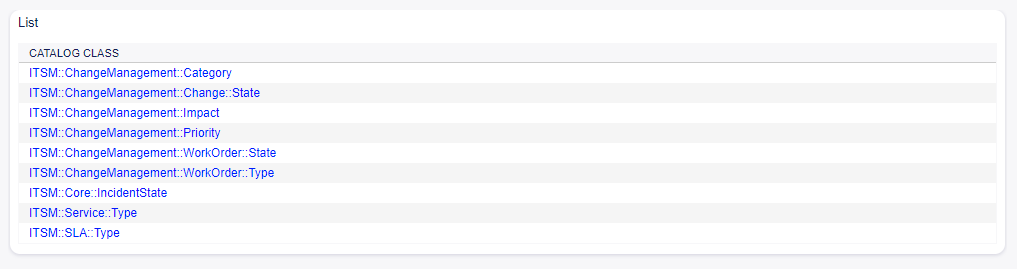
General Catalog Class List Screen
New Classes
- ITSM::ChangeManagement::Category This class contains the severity of categories used in the Category
Impact Priority matrix.
ITSM::ChangeManagement::Change::State This class contains the change states used in the State Machine. ITSM::ChangeManagement::Impact This class contains the severity of impacts used in the Category
Impact Priority matrix.
- ITSM::ChangeManagement::Priority This class contains the priorities used in the Category Impact
Priority matrix.
- ITSM::ChangeManagement::WorkOrder::State This class contains the work order states used in the
State Machine.
- ITSM::ChangeManagement::WorkOrder::Type This class contains the work order types used in ITSM
Changes.
Note
The other classes was added by ITSM Core package.
Change Settings
After installation of the package a new group Change Settings will be available with two new modules in the administrator interface.
Category Impact Priority
Use this screen to manage the category impact priority matrix. The management screen is available in the Category Impact Priority module of the Change Settings group.
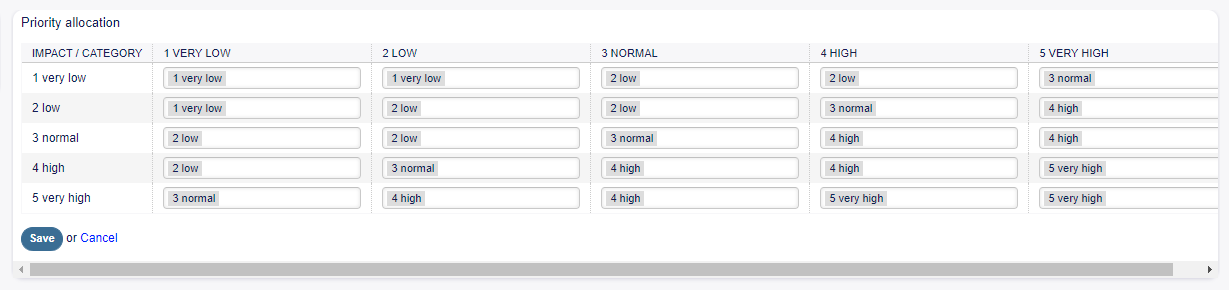
Criticality - Impact - Priority Screen
This matrix defines the priority of a change based on the category and impact. The calculated priority will be used in Add Change and Edit Change screens.
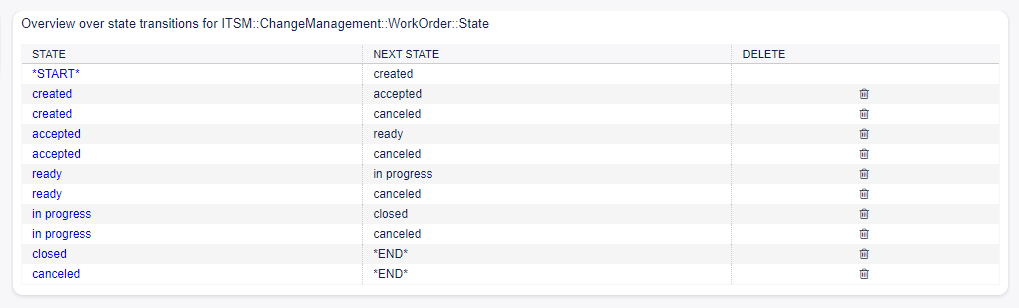
State Machine
Rexpondo::ITSM features state machines which define valid statuses and possible result statuses for a change and for a work order.
Use this screen to manage the state machines. The state machine management screen is available in the State Machine module of the Change Settings group.

Admin State Machine Screen
Manage State Machines
The statuses and possible result statuses should be defined as transitions. In Rexpondo::ITSM, this is illustrated as a table.
- To add a new transition:
Select the state machine to add the new transition to from the Action widget of the left sidebar.
Select a state from the transition should start.
Select a state to the transition should go.
Click on the Save or Save and finish button.

Add New State Transition Screen
- To edit a transition:
Click on a state machine in the list of state machines.
Click on a transition name.
Modify the Next state.
Click on the Save or Save and finish button.

Edit New State Transition Screen
- To delete a transition:
Click on a state machine in the list of state machines.
Click on the trash icon in the last column of transition table.
Click on the Yes button in the confirmation screen.

Delete New State Transition Screen
Change State Machine
The standard installation generates suggestions based on the following logic model.
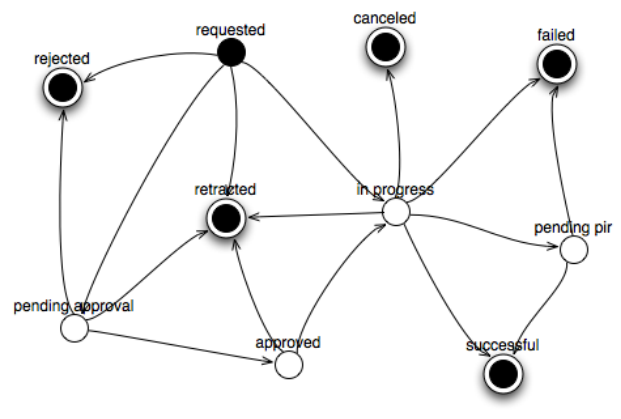
Change State Machine Model
To see the state machine transitions, click on the ITSM::ChangeManagement::Change::State item in the list of state machines.
See also:
The states of the change state machine are defined in the ITSM::ChangeManagement::Change::State class in the General Catalog.
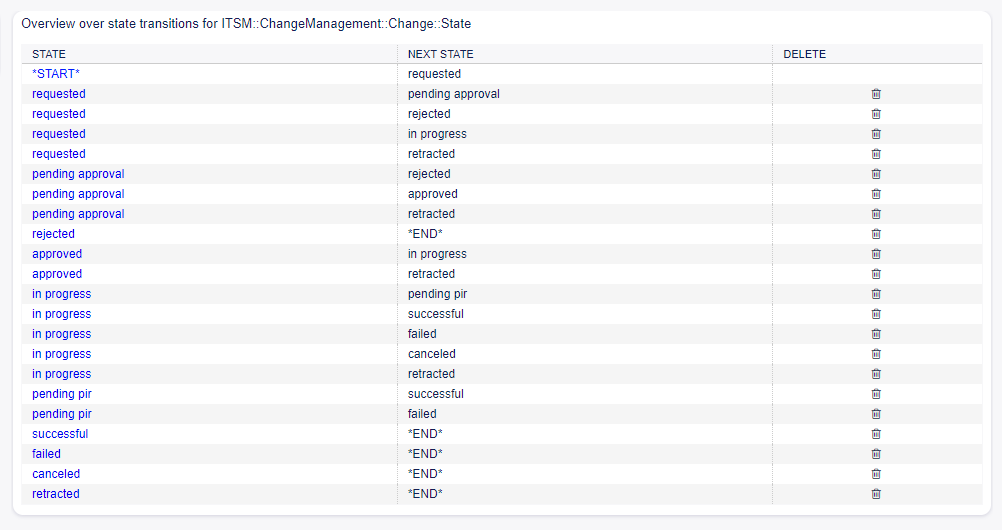
Change State Machine Transitions Screen
Work Order State Machine
The standard installation generates suggestions based on the following logic model.
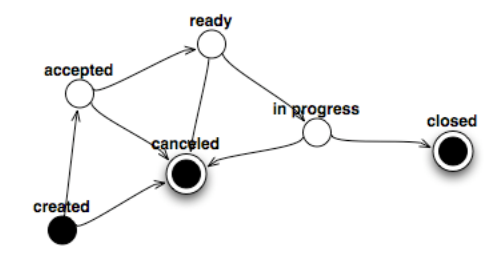
Workorder State Machine Model
To see the state machine transitions, click on the ITSM::ChangeManagement::WorkOrder::State item in the list of state machines.
Workorder State Machine Transitions Screen
See also:
The states of the work order state machine are defined in the ITSM::ChangeManagement::WorkOrder::State class in the General Catalog.
Agent Interface
This chapter describes the new features that are available in the agent interface after installation of the package.
ITSM Changes
After installation of the package a new menu will be available in the agent interface.
Note
In order to grant users access to the ITSM Changes menu, you need to add them as member to the group itsm-change.
The menu items that were added by this package will be visible after you log-in to the system again.
The implementation of a change, including all required work orders, follows the underlying workflow shown below:
Creation of a change.
Creation of needed work orders.
Definition of conditions and actions.
Execution of a change.
Overview
This screen gives an overview of changes.

ITSM Changes Overview Screen
Changes can be filtered by clicking on a state name in the header of the overview widget. There is an option All to see all changes. The numbers after the state names indicates how many changes are in each states.
See also:
See setting ITSMChange::Frontend::AgentITSMChange###Filter::ChangeStates to define the
work order states that will be used as filters in the overview.
- To limit the number of displayed changes per page:
Click on the gear icon in the top right corner of the overview header.
Select the maximum number of changes displayed per page.
Click on the Submit button.
The displayed attributes can be defined via the system configuration. Not all attributes are displayed by default. The possible attributes are:
ActualEndTime Date and time at which the change implementation was completed. ActualStartTime Date and time at which the change implementation began. Category Category or type of change. ChangeBuilder Name of the change builder. ChangeManager Name of the change manager. ChangeNumber System generated change number. ChangeState Change status. ChangeStateSignal Change status indicator to be shown as traffic light. ChangeTime Date and time at which the change was modified. ChangeTitle Name of the change. CreateTime Date and time at which the change was created. DynamicField_ChangeFieldName Dynamic field that is associated to the work order. Impact Expected effect of the change. PlannedEndTime Projected change implementation completion date and time. PlannedStartTime Planned change implementation start date and time. Priority Priority level of the change. RequestedTime Customer’s desired implementation date. Services Services affected by the change. WorkOrderCount Number of work orders related to the change.
See also:
See setting ITSMChange::Frontend::AgentITSMChange###ShowColumns to define the displayed attributes.
- To see the details of a change:
Click on the row of a change.
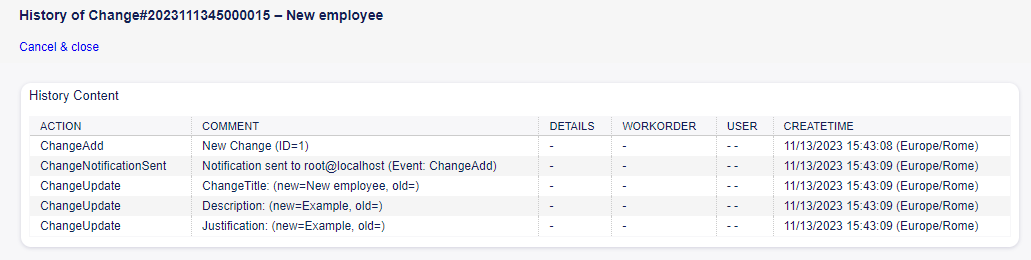
The Change Zoom screen has an own menu.
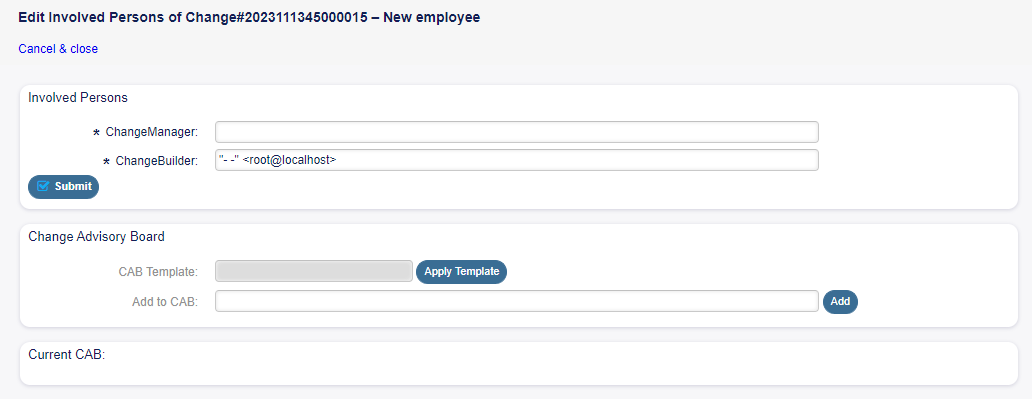
Back This menu item goes back to the previous screen. History This menu item opens a new window to see the history of the change. Print This menu item opens a PDF file to show the printer friendly version of the screen. You can save or print this PDF file. Edit This menu item opens a new window to edit the change. Involved Persons Use this screen to add persons to the change. Change Manager * Assigns change manager privileges to an agent for the current change.
Note
Only those agent can be added as change manager, who is member of group itsmchange-manager.
ITSM Changes Zoom Screen
ITSM Changes History Screen
ITSM Changes Edit Screen
Involved Persons Screen
Change Builder * Defines the agent who processes and defines the current change. When creating a new change, the current agent is automatically entered as the change builder.
Note
Only those agent can be added as change builder, who is member of group itsm-changebulder
Change Advisory Board Defines a group of people which can include agents and customers. Add Workorder Use this window to add new work orders to the change.

Add Workorder To Change Screen
The following settings are available when adding or editing this resource. The fields marked with an asterisk are mandatory.
- Title * The name of this resource. Any type of characters can be entered to this field including
uppercase letters and spaces. The name will be displayed in the overview table.
Instruction * Longer text description of the work order about what to do here. Workorder Type Select a type for the work order. The types are defined in class
ITSM::ChangeManagement::WorkOrder::Typein the General Catalog.
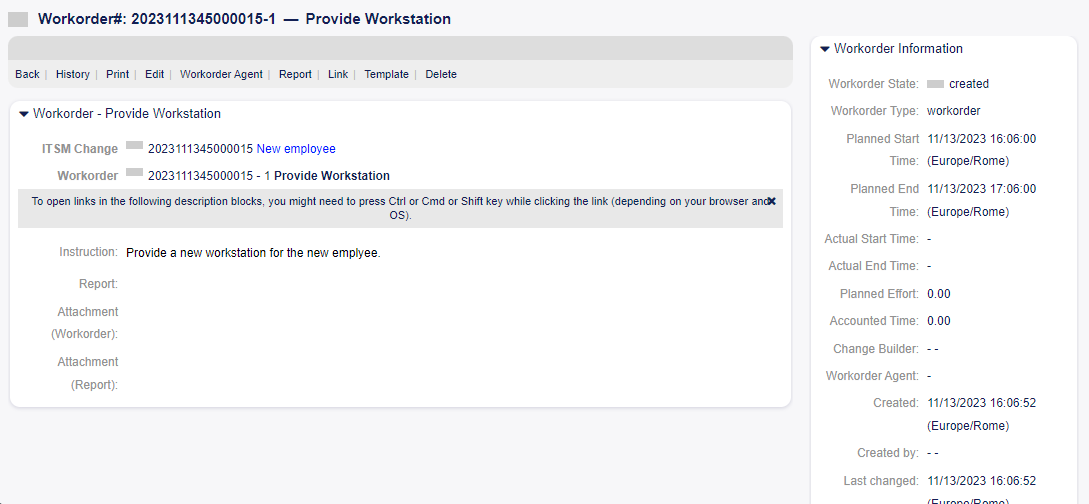
Planned Start Time Select a planned start time for the work order. Planned End Time Select a planned end time for the work order. Planned Effort Add a value in any work unit to specify the planned effort. Attachment Enables related files and documents to be attached.
After adding a work order, the Work Order Zoom screen will be opened in a new browser tab.
Add Workorder Screen
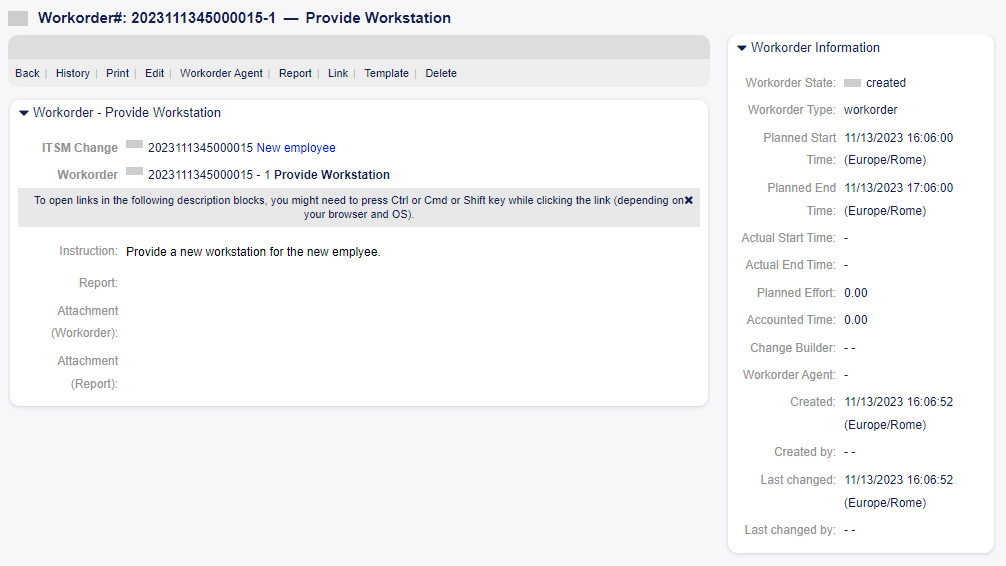
The Work Order Zoom screen has an own menu.
Back This menu item goes back to the previous screen. History This menu item opens a new window to see the history of the work order. Print This menu item opens a PDF file to show the printer friendly version of the screen. You can save
or print this PDF file.
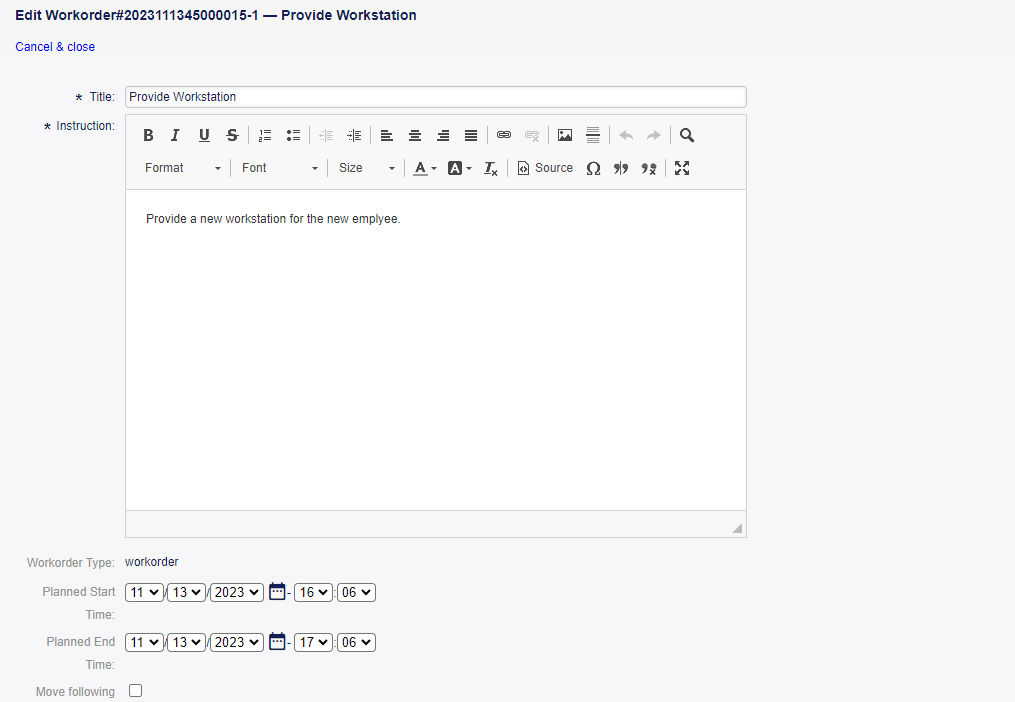
- Edit This menu item opens a new window to edit the work order.
- Move following workorders accordingly If this is checked, the subsequent work orders will be
moved in time according to times set in Planned Start Time and Planned End Time fields.
Workorder Agent Use this menu item to assign an agent to the work order.
Note
Only those agent can be added as work order agent, who is member of group itsm-change.
- Report Use this menu item to document the progress made on the work order. This screen can be
used as log of work order.
- Report * This is the body of the report. As there is only the same text area for all reports, it is
suggested to add timestamps to each entries.
State The next state of the work order.
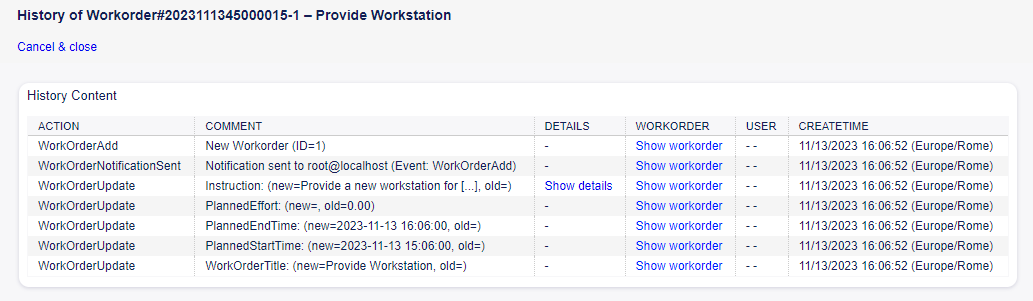
Workorder History Screen
Edit Workorder Screen

Edit Workorder Agent Screen
See also:
The possible next states are defined in the work order State Machine, but they can be filtered using conditions.
Accounted Time Add the accounted time in time units. Attachment Enables related files and documents to be attached. Link This menu item opens the standard link screen of Rexpondo. Work orders can be linked to services
or tickets. Existing links can also be managed here.
Edit Workorder Agent Screen
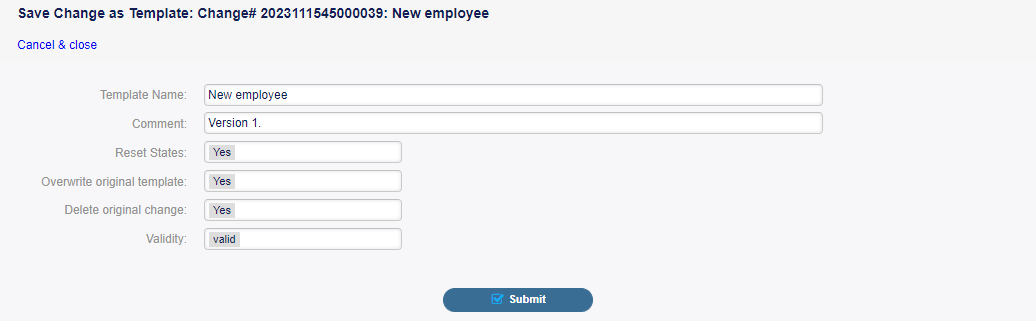
Template Use this screen to save the work order as template
Template Name * The name of this resource. Any type of characters can be entered to this field including uppercase letters and spaces. The name will be displayed in the overview table.
Comment Add additional information to this resource.
Note
It is recommended to add a version number in this field to be is easier to identify the correct template.
Reset States All states are reset if selecting Yes. Validity Set the validity of this resource. Each resource can be used in Rexpondo only, if this field is set to valid. Setting this field to invalid or invalid-temporarily will disable the use of the resource.
Print This menu item opens a PDF file to show the printer friendly version of the screen. You can save or print this PDF file. Edit This menu item opens a new window to edit the change.
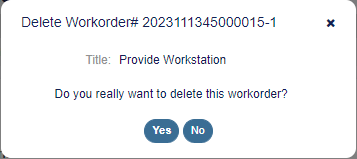
Delete Workorder Screen
Edit ITSM Change Screen
Add Workorder (from Template) Use this screen to add a work order from template.
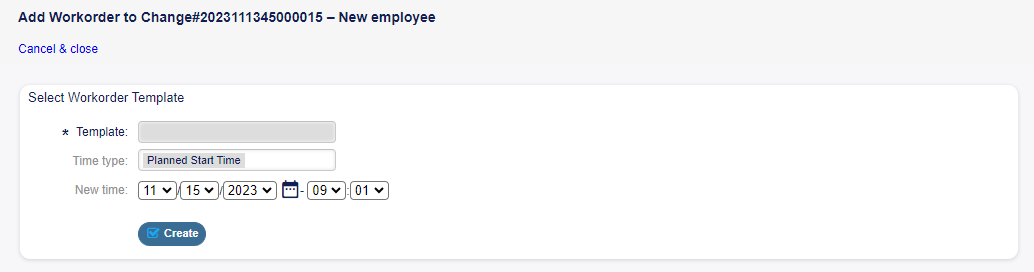
Add Workorder (From Template) Screen
Template * Select a work order template from the list of work order templates. Time type Select the time type that you want to redefine in the next field. New time Specify a new time for the time type selected above.
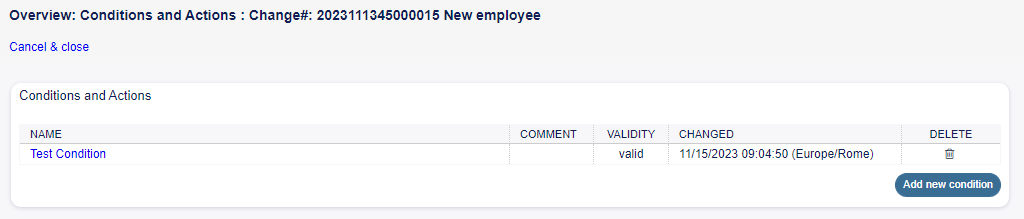
See also: Work order templates can be created with Template menu item in the Work Order Zoom screen. Conditions Use this screen to add new conditions to the change.
Add Conditions To Workorder Screen
Note
The defined conditions are not executed in a certain order
- To add a new condition:
Click on the Add new condition button.
- To edit a condition:
Click on a condition in the list of conditions.
- To delete a condition:
Click on the trash icon in the list of conditions.
Click on the OK button in the confirmation dialog.
Add Condition and Edit Condition screens consist of three widgets. In the Condition widget:
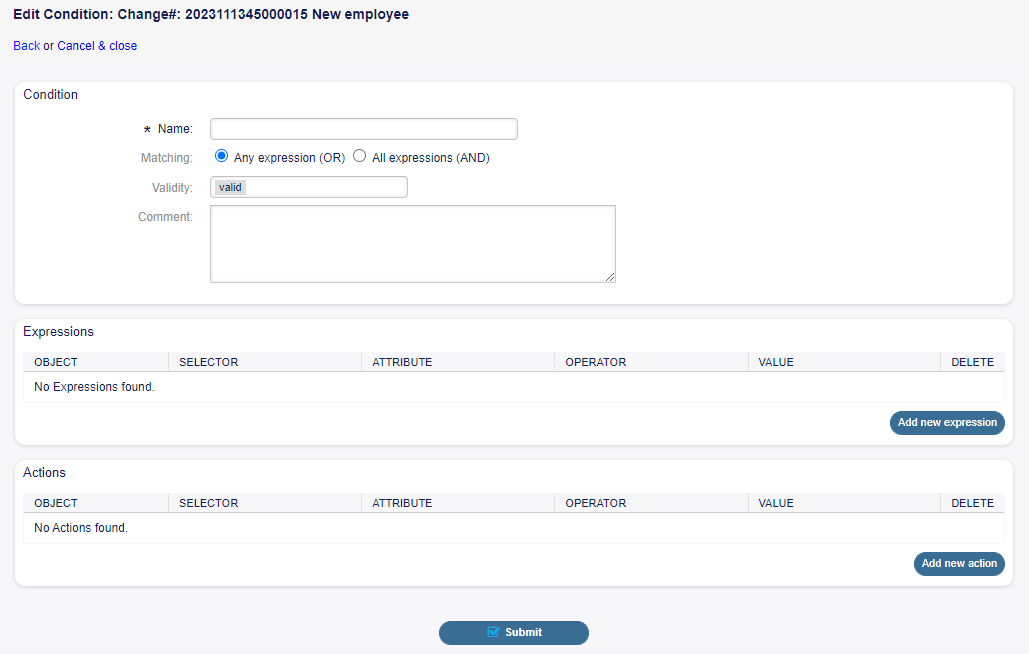
Add Condition Screen
Name * The name of this resource. Any type of characters can be entered to this field including uppercase letters and spaces. The name will be displayed in the overview table.
Note
Conditions are sorted by name. Use 100, 200, etc. as prefix to set the sorting order. All conditions will be evaluated regardless of its position.
Matching Matching type of expressions. Validity Set the validity of this resource. Each resource can be used in Rexpondo only, if this field is set to valid. Setting this field to invalid or invalid-temporarily will disable the use of the resource. Comment Add additional information to this resource. It is recommended to always fill this field as a description of the resource with a full sentence for better clarity, because the comment will be also displayed in the overview table.
In the Expressions widget the expression can be added. The matching type of expressions (OR or AND) can be defined above.
In the Actions widget the actions can be added to be executed if the expressions are met. The operator set enables the selected attribute to be set at a specific value, if the defined condition is true. On the other hand, the operator lock freezes the selected attribute, for as long as the defined condition is true, i.e. a manual change is not possible.
Note
Actions are processed in the order they were set
Link This menu item opens the standard link screen of Rexpondo. Changes can be linked to any other objects like FAQ articles, services, tickets or configuration items. Existing links can also be managed here.
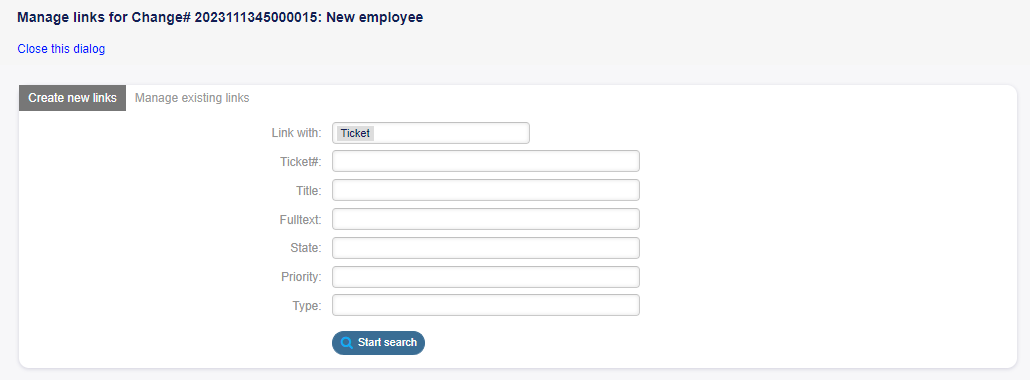
Workorder Link Screen
Move Time Slot Use this screen to shift the planned change implementation time frame.
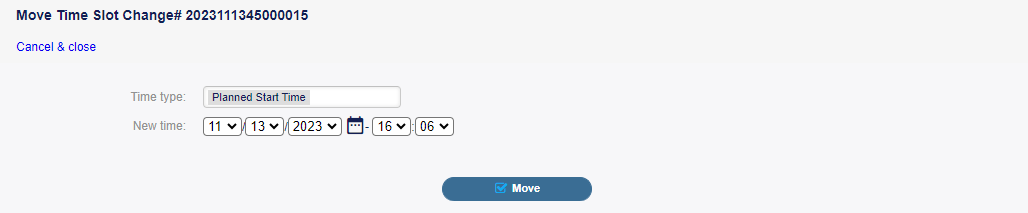
Workorder Move Time Slot Screen
Time type Select the time type that you want to redefine in the next field. New time Specify a new time for the time type selected above. Template Use this screen to save the change as template. New changes can be start from template in New (From Template) menu item.
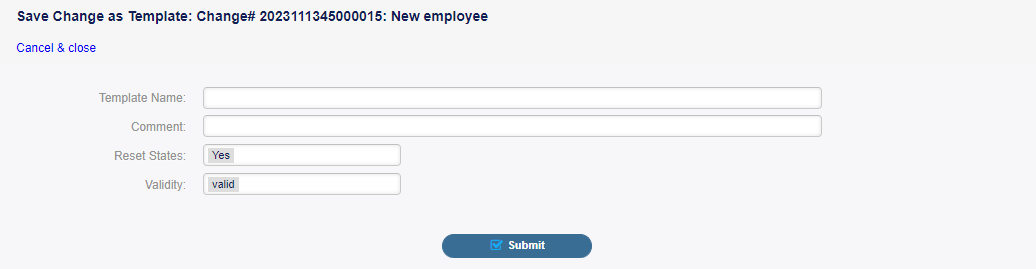
Workorder Template Screen
Template Name * The name of this resource. Any type of characters can be entered to this field including uppercase letters and spaces. The name will be displayed in the overview table. Comment Add additional information to this resource.
Note
It is recommended to add a version number in this field to be is easier to identify the correct template.
Reset States All states are reset if selecting Yes. Validity Set the validity of this resource. Each resource can be used in Rexpondo only, if this field is set to valid. Setting this field to invalid or invalid-temporarily will disable the use of the resource.
New
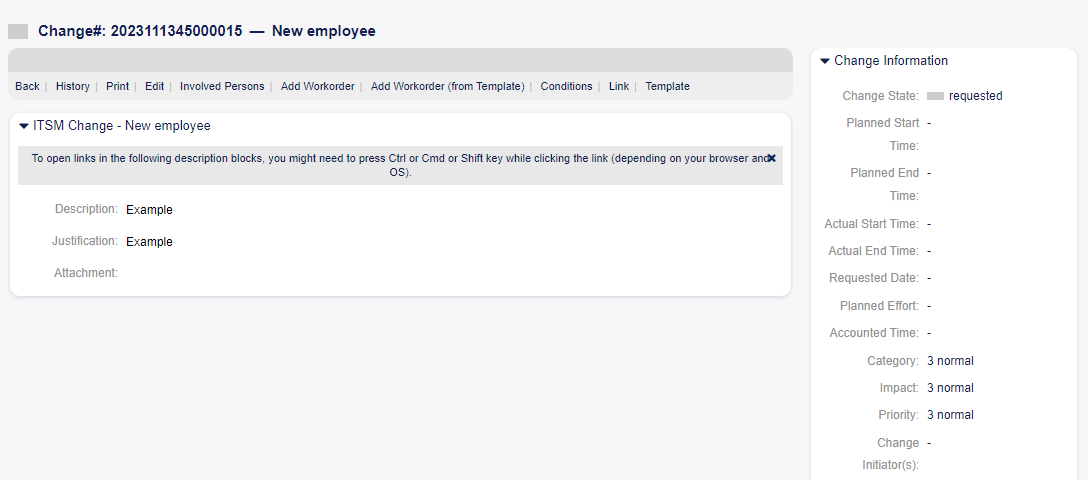
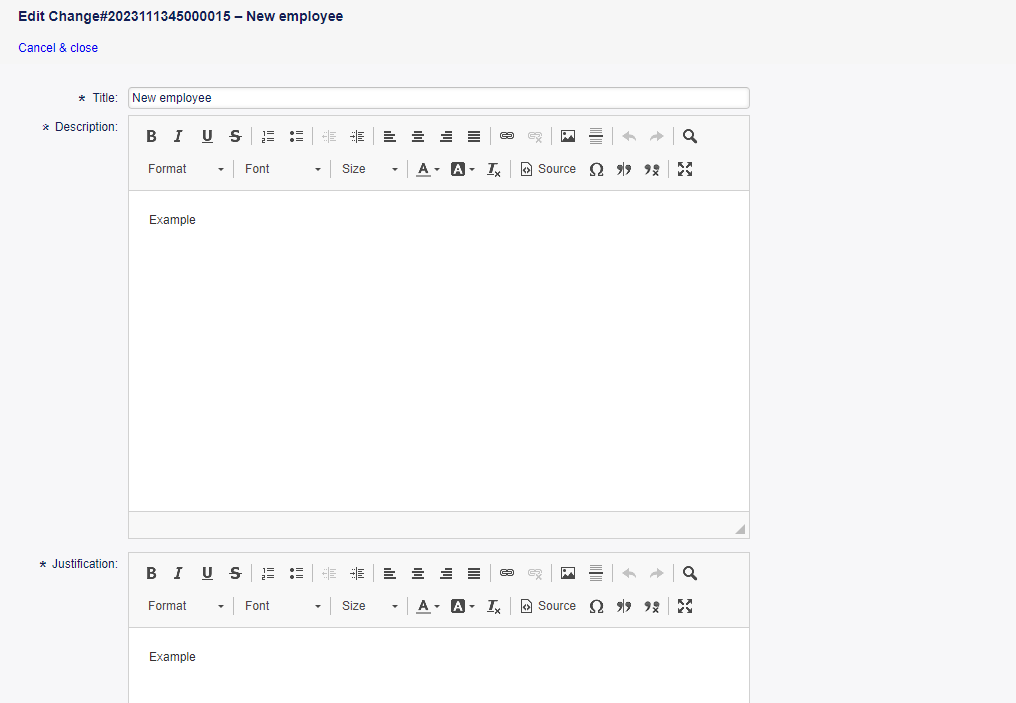
Use this screen to add new changes to the change management.
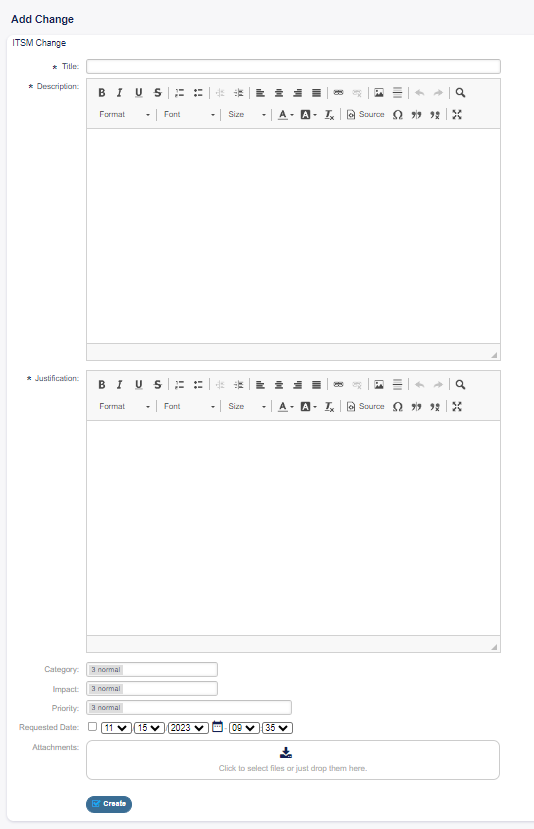
Add Change Screen
The following settings are available when adding or editing this resource. The fields marked with an asterisk are mandatory.
Title * The name of this resource. Any type of characters can be entered to this field including uppercase letters and spaces. The name will be displayed in the overview table. Description * Longer text description of the change. Justification * Text explanation of the reasons behind the change. Answer to the question: What is the likely consequence if the change is not implemented? Category * Defines the type of change. Impact * Defines the effects or impact the change will have. Priority * Defines the priority of the change from the selected Category and Impact.
See also: See the Category Impact Priority matrix to define the priority. Requested Date Select a date when a customer requested the change.
See also:
This attribute can be deactivated in system configuration under Frontend → Agent → View.
Attachments Enables related files and documents to be attached.
New (From Template)
Use this screen to add new changes from template
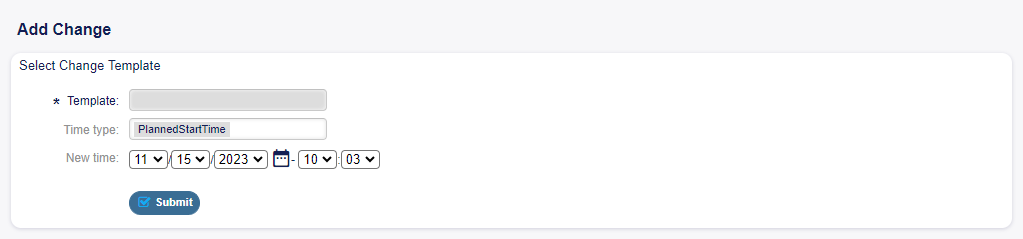
Add Change From Template Screen
See also: Templates can be saved in the Change Zoom screen using the Template menu item. Template * Select a change from the list. Time type Select the type of planned time to be set in the next field. New time Specify the new time for the time selected above. This time will be used in the change instead of the saved one.
See also: Templates can be edited in the Templates screen
Schedule
Use this screen to filter ITSM changes based on certain criteria. This overview screen is available in the Schedule menu item of the ITSM Changes menu.
Changes can be filtered by clicking on a state name in the header of the overview widget. The numbers after the state names indicates how many changes are in each states.

Schedule Overview Screen
See also:
See setting ITSMChange::Frontend::AgentITSMChangeSchedule###Filter::ChangeStates to
define the change states that will be used as filters in the overview.
- To limit the number of displayed changes per page:
Click on the gear icon in the top right corner of the overview header.
Select the maximum number of changes displayed per page.
Click on the Save button.
- To see the details of a change:
Click on the row of a change.
ITSM Change Zoom Screen
The displayed attributes can be defined via the system configuration. Not all attributes are displayed by default. The possible attributes are:
ActualEndTime Date and time at which the change implementation was completed.
ActualStartTime Date and time at which the change implementation began.
Category Category or type of change.
ChangeBuilder Name of the change builder.
ChangeManager Name of the change manager.
ChangeNumber System generated change number.
ChangeState Change status.
ChangeStateSignal Change status indicator to be shown as traffic light.
ChangeTime Date and time at which the change was modified.
ChangeTitle Name of the change.
CreateTime Date and time at which the change was created.
DynamicField_ChangeFieldName Dynamic field that is associated to the change.
Impact Expected effect of the change.
PlannedEndTime Projected change implementation completion date and time.
PlannedStartTime Planned change implementation start date and time.
Priority Priority level of the change.
RequestedTime Customer’s desired implementation date.
Services Services affected by the change.
WorkOrderCount Number of work orders related to the change.
See also:
See setting ITSMChange::Frontend::AgentITSMChangeSchedule###ShowColumns to define the
displayed attributes.
Projected Service Availability
Use this screen to filter ITSM changes based on certain criteria. This overview screen is available in the Projected Service Availability menu item of the ITSM Changes menu.

Projected Service Availability Screen
Changes can be filtered by clicking on a state name in the header of the overview widget. The numbers after the state names indicates how many changes are in each states.
See also:
See setting ITSMChange::Frontend::AgentITSMChangePSA###Filter::ChangeStates to define
the change states that will be used as filters in the overview.
- To limit the number of displayed changes per page:
Click on the gear icon in the top right corner of the overview header.
Select the maximum number of changes displayed per page.
Click on the Save button.
- To see the details of a change:
Click on the row of a change
ITSM Change Zoom Screen
The displayed attributes can be defined via the system configuration. Not all attributes are displayed by default. The possible attributes are:
ActualEndTime Date and time at which the change implementation was completed. ActualStartTime Date and time at which the change implementation began. Category Category or type of change. ChangeBuilder Name of the change builder. ChangeManager Name of the change manager. ChangeNumber System generated change number. ChangeState Change status. ChangeStateSignal Change status indicator to be shown as traffic light. ChangeTime Date and time at which the change was modified. ChangeTitle Name of the change. CreateTime Date and time at which the change was created. DynamicField_ChangeFieldName Dynamic field that is associated to the change. Impact Expected effect of the change. PlannedEndTime Projected change implementation completion date and time. PlannedStartTime Planned change implementation start date and time. Priority Priority level of the change. RequestedTime Customer’s desired implementation date. Services Services affected by the change. WorkOrderCount Number of work orders related to the change.
See also:
See setting ITSMChange::Frontend::AgentITSMChangePSA###ShowColumns to define the displayed attributes.
PIR
Use this screen to filter work orders based on certain criteria. This overview screen is available in the PIR menu item of the ITSM Changes menu.

PIR Overview Screen
Work orders can be filtered by clicking on a state name in the header of the overview widget. The numbers after the state names indicates how many work orders are in each states.
See also:
See setting ITSMChange::Frontend::AgentITSMChangePIR###Filter::WorkOrderStates to
define the work order states that will be used as filters in the overview.
- To limit the number of displayed work orders per page:
Click on the gear icon in the top right corner of the overview header.
Select the maximum number of work orders displayed per page.
Click on the Save button.
- To see the details of a work order:
Click on the row of a work order.
The displayed attributes can be defined via the system configuration. Not all attributes are displayed by default. The possible attributes are:
ActualEndTime Date and time at which the change implementation was completed. ActualStartTime Date and time at which the change implementation began. Category Category or type of change. ChangeBuilder Name of the change builder. ChangeManager Name of the change manager. ChangeNumber System generated change number. ChangeState Change status. ChangeStateSignal Change status indicator to be shown as traffic light. ChangeTime Date and time at which the change was modified.
Workorder Zoom Screen
ChangeTitle Name of the change. CreateTime Date and time at which the change was created. DynamicField_WorkOrderFieldName Dynamic field that is associated to the work order. Impact Expected effect of the change. PlannedEndTime Projected change implementation completion date and time. PlannedStartTime Planned change implementation start date and time. Priority Priority level of the change. RequestedTime Customer’s desired implementation date. Services Services affected by the change. WorkOrderAgent Agent assigned to the PIR. WorkOrderCount Number of work orders related to the change. WorkOrderNumber System generated work order number. WorkOrderState Status of the work order. WorkOrderStateSignal Work order status indicator to be shown as traffic light. WorkOrderTitle Name of the work order. WorkOrderType Type of the work order.
See also:
See setting ITSMChange::Frontend::AgentITSMChangePIR###ShowColumns to define the displayed attributes.
Templates
Use this screen to manage templates for ITSM changes. The template management screen is available in the Templates menu item of the ITSM Changes menu.

Template Overview Screen
Templates can be filtered by clicking on a type name in the header of the overview widget. There is an option All to see all templates. The numbers after the type names indicates how many templates are in each types.
See also:
See setting ITSMChange::Frontend::AgentITSMTemplateOverview###Filter::TemplateTypes
to define the template types that will be used as filters in the overview.
- To add a new template:
Go to the New ITSM change screen.
Create new changes, work orders or CABs.
Click on the Template menu item to save it as template.
- To edit basic information of a template:
Click on the template name in the list of templates.
Modify the fields.
Click on the Save button.

Edit ITSMChange Template Screen
- To edit the content of a template:
Click on the pencil icon in the Edit Content column.
Click on the Yes button in the confirmation dialog.
Modify the created change.
Click on the Template menu item to save it as template.
Edit Template Content Screen
Note
This will create a new change from this template, so you can edit and save it. The new change will be deleted automatically after it has been saved as template.
- To delete a template:
Click on the trash icon in the list of templates.
Click on the Yes button.
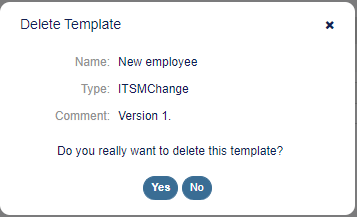
Delete Template Screen
The displayed attributes can be defined via the system configuration. Not all attributes are displayed by default. The possible attributes are: ChangeBy Username of the agent who last modified the template. ChangeTime Date and time at which the template was modified. Comment Comments or description of the template. CreateBy Username of the agent who created the template. CreateTime Date and time at which the template was created. Delete Option to delete a chosen template. EditContent Option to edit the content of a chosen template. Name Name of the template. Type Type of the template. Valid Validity of the template. Templates with invalid or invalid-temporarily validity cannot be used by
change builders.
See also:
See setting ITSMChange::Frontend::AgentITSMTemplateOverview###ShowColumns to define
the displayed attributes.
Search
Use this screen to search for changes.
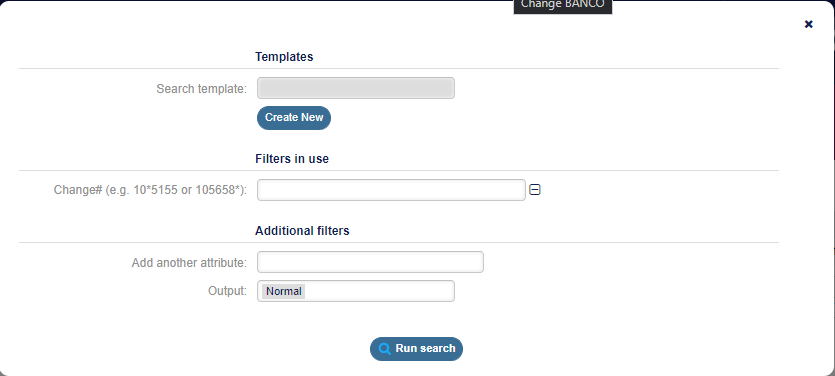
ITSMChange Search Screen
- To search for changes:
Click on the Search menu item in the ITSM Changes menu.
Fill in the required fields.
Click on the Run Search button.
See the search result.
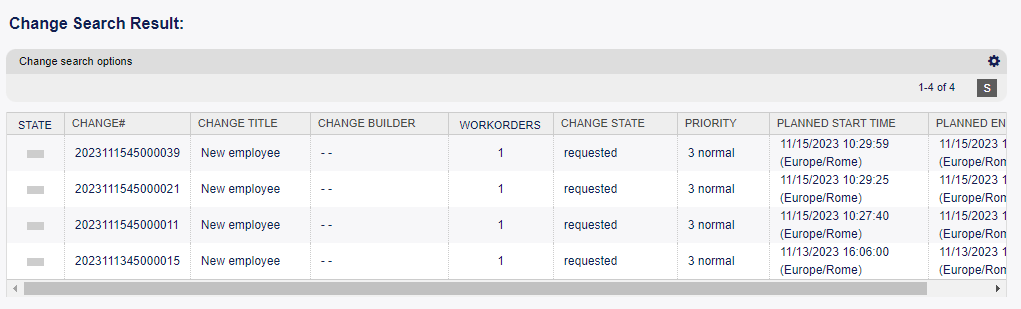
ITSMChange Search Results Screen
- To limit the number of displayed changes per page:
Click on the gear icon in the top right corner of the overview header.
Select the maximum number of changes displayed per page.
Click on the Save button.
- To see the details of a change:
Click on the row of a change.
ITSM Changes Zoom Screen
The displayed attributes can be defined via the system configuration. Not all attributes are displayed by default. The possible attributes are:
ActualEndTime Date and time at which the change implementation was completed. ActualStartTime Date and time at which the change implementation began. Category Category or type of change. ChangeBuilder Name of the change builder. ChangeManager Name of the change manager. ChangeNumber System generated change number. ChangeState Change status. ChangeStateSignal Change status indicator to be shown as traffic light. ChangeTime Date and time at which the change was modified. ChangeTitle Name of the change. CreateTime Date and time at which the change was created. DynamicField_ChangeFieldName Dynamic field that is associated to the change. Impact Expected effect of the change. PlannedEndTime Projected change implementation completion date and time. PlannedStartTime Planned change implementation start date and time. Priority Priority level of the change. RequestedTime Customer’s desired implementation date. Services Services affected by the change. WorkOrderCount Number of work orders related to the change.
See also:
See setting ITSMChange::Frontend::AgentITSMChangeSearch###ShowColumns to define the displayed attributes.
External Interface
This package has no external interface.